Project 3: Arduino Bush Button - Control LED
Main Ideas:
Introduction to the new electronic parts (pushbuttons), explains the difference between digital input pins vs digital output pins of Arduino Uno microcontroller board and how we can program them to receive input and react to that and produce the output. Main programming concept Control Statements (IF / ELSE & Switch Case).
Project Description
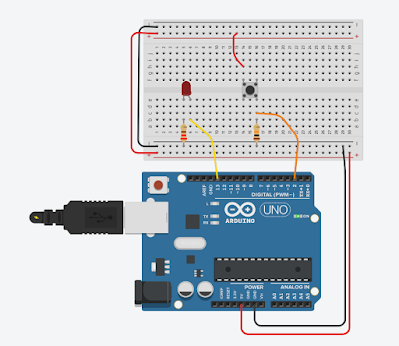
Turns on and off a light emitting diode (LED) connected to digital pin
13, when pressing a pushbutton (digital input 5 V) attached to pin 2 and if not
pressed (digital input 0 V) LED will be off.
Circuit
- RED LED
- Pushbutton
- 1* 1K Resistor
- 1* 10K Resistor
- Arduino UNO
//use this variable to read the state of the pushbutton value
int buttonState = 0;
void setup()
{
// connected to Pin 2 of the Arduino the pushbutton pin, setup the pin2 as input to receive the input button pushed
pinMode(2, INPUT);
// the red LED is connected to Pin 13 of the Arduino, set up all the LED as OUTPUT
pinMode(13, OUTPUT);
}
void loop()
{
// read the state of the pushbutton
buttonState = digitalRead(2);
// check if pushbutton is pressed. if it is, the
// button state is HIGH
if (buttonState == HIGH) {
digitalWrite(13, HIGH);
} else {
digitalWrite(13, LOW);
}
delay(10); // Delay a little bit to improve simulation performance
}

No comments:
Post a Comment